Tuesday, June 5, 2012
Free Needlepoint Pattern for Pincushion
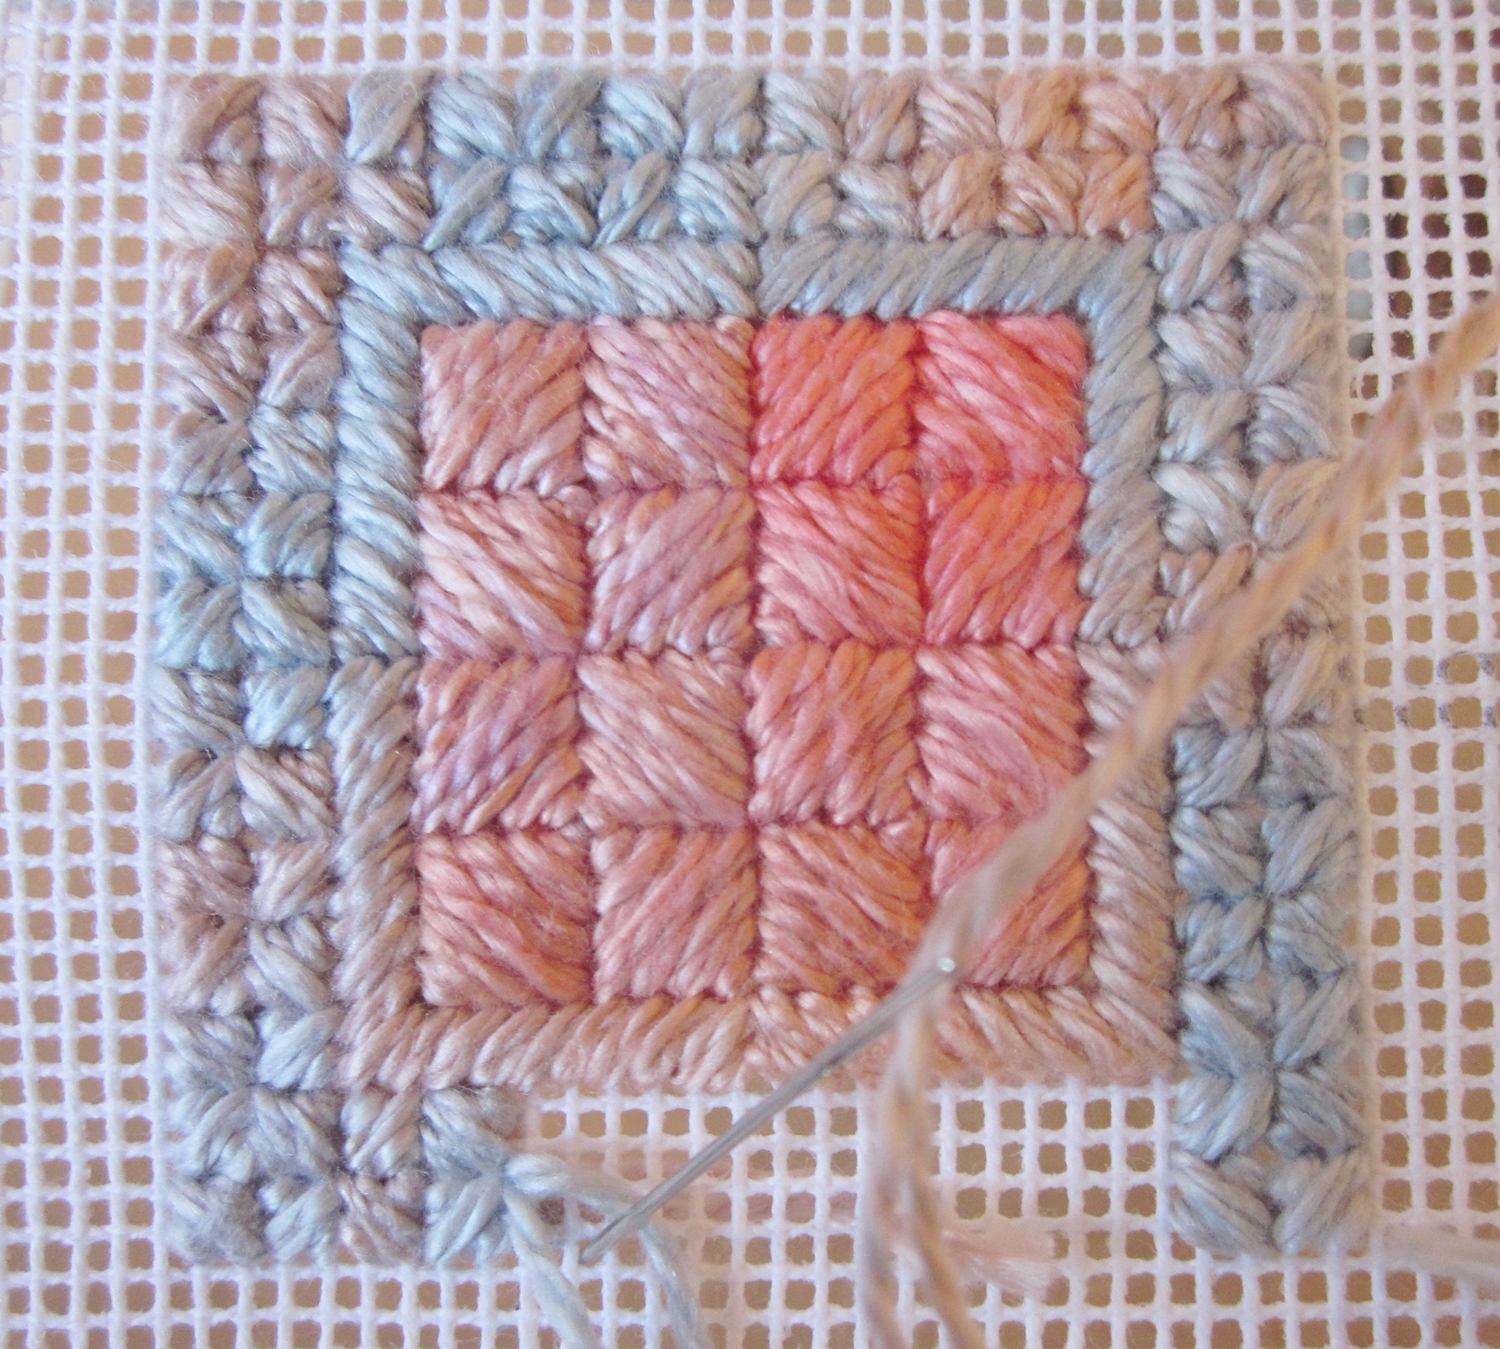
This little pincushion is quick to make as a useful gift for a special friend. A long time ago I made a slightly larger one for a dear friend. I was pleasantly surprised when I visited her years later and noticed the pincushion on her work space filled with pins and assorted needles all trailing little bits of thread and obviously well used.
Use a variegated thread for a pretty effect. Here is the link to the free needlepoint pattern. Click on the printer icon for your printer friendly copy. I'd love to have any feedback from you, positive or negative.
Monday, June 4, 2012
Sewing up a Needlepoint Pincushion
These two small canvas work pincushions were worked on a small scrap of canvas I had left over from another project. I bound the edges of the canvas with masking tape to prevent the threads from snagging as I worked and then I marked the centre of each pincushion with a tacking thread. I didn't bind the top because its the selvage and it won't snag.
The threads I used are Caron Watercolours. Its a 3 ply thread and I split it and used 2 strands for the pincushion on the left, and only 1 thread for the outer rows of stitching on the other pincushion. You can see a close up picture in my previous post 'Canvas Work Pincushion'.
To finish off the pincushions I chose a cotton patchwork fabric for the backs.
Sometimes when I make up a canvas work pincushion I prepare it by doing an extra round of half cross stitch. I do this once I have finished embroidering the design. The idea is that when you stitch the canvas to the backing fabric, you 'stitch in the ditch' between the the last row of the design (which is satin stitch on these pincushions) and the row of half cross stitch.
When the pincushion has been turned this extra row of stitches helps to stop a line of bare canvas from showing around the sides of the pincushion.
I trimmed the canvas and cut off the corners before I turned it.
Then I stuffed the pincushion with a polyester cushion stuffing and stitched it up using ladder stitch.
And here they are...
It's a quick, fun little project to do. It's also ideal for you if you haven't tried doing needlepoint before. I will post a free pattern with a stitch guide in my next post if all goes according to plan.
The threads I used are Caron Watercolours. Its a 3 ply thread and I split it and used 2 strands for the pincushion on the left, and only 1 thread for the outer rows of stitching on the other pincushion. You can see a close up picture in my previous post 'Canvas Work Pincushion'.
To finish off the pincushions I chose a cotton patchwork fabric for the backs.
When the pincushion has been turned this extra row of stitches helps to stop a line of bare canvas from showing around the sides of the pincushion.
I trimmed the canvas and cut off the corners before I turned it.
Then I stuffed the pincushion with a polyester cushion stuffing and stitched it up using ladder stitch.
And here they are...
It's a quick, fun little project to do. It's also ideal for you if you haven't tried doing needlepoint before. I will post a free pattern with a stitch guide in my next post if all goes according to plan.
Friday, June 1, 2012
Canvas work pincushion
I haven't posted for a while but the family have now left us and are on their way to settle in Australia. How sad we were to see them go but wish them only happiness and success in their new life over there.
Back to stitching. I always like working on little projects and a while ago I began been trying out some new threads on two small canvas work pincushions. The joy of these small projects for me is that they are quick to do and give a lovely sense of accomplishment when they are so soon complete.
I stitched the pincushions on a 14 count mono canvas. The thread is a 3-ply cotton from the Caron Watercolour Collection, a thread I haven't used before. The variegated colours are so tantalising to look at and I loved the way they blend as you go along. It really is a visual treat to work with such beautiful colours.
It is recommended by Caron that you split the three threads and use only two of the three strands for a 14 count canvas. As I stitched with the two strands I separated them with my needle and plunged my needle into the canvas between them as you can see in photo. This helped to keep the two strands looking neat and stop them from twisting.
I did however find that the two strands gave quite a bit of resistance when I pulled them through the canvas and I decided half way through the second pincushion to try using only 1 thread. It certainly was easier to work with and more gentle on the fingers. The canvas peeps through in places if you look hard but I think the coverage is adequate. If you look carefully you can see that the small pinkish cushion stitches and the outside round of satin stitch look thinner than the centre of the pincushion where I used two strands.
I have put the two pincushions together and will post photos in my next post. I am also charting the design and will include it as a free pattern for you to download. 'Till next time happy stitching.
Back to stitching. I always like working on little projects and a while ago I began been trying out some new threads on two small canvas work pincushions. The joy of these small projects for me is that they are quick to do and give a lovely sense of accomplishment when they are so soon complete.
I stitched the pincushions on a 14 count mono canvas. The thread is a 3-ply cotton from the Caron Watercolour Collection, a thread I haven't used before. The variegated colours are so tantalising to look at and I loved the way they blend as you go along. It really is a visual treat to work with such beautiful colours.
It is recommended by Caron that you split the three threads and use only two of the three strands for a 14 count canvas. As I stitched with the two strands I separated them with my needle and plunged my needle into the canvas between them as you can see in photo. This helped to keep the two strands looking neat and stop them from twisting.
I did however find that the two strands gave quite a bit of resistance when I pulled them through the canvas and I decided half way through the second pincushion to try using only 1 thread. It certainly was easier to work with and more gentle on the fingers. The canvas peeps through in places if you look hard but I think the coverage is adequate. If you look carefully you can see that the small pinkish cushion stitches and the outside round of satin stitch look thinner than the centre of the pincushion where I used two strands.
Friday, May 11, 2012
Chikan SAL progress
I have been catching up on the chikan stitch along arranged by Anita on her blog artisticfingers.
Here is my chikan project so far.
The fabric is very transparent and shows off the shadow work, but I had to be careful because any untidy work on the back shows through to the front. The shadows in the photo below pick up some of the places where I have ended off the threads and perhaps worked over them too much when trying to keep them tidy.
I have enjoyed the SAL but it may be a while before my piece is completed. The family have arrived back to stay with us and I am a busy granny again.
The other happening here is that after three long years Rod has finished writing his book on Building Resilience, a self help book on improving your own personal resilience to cope with the difficult times. He has received the first copies from the printer and is setting up distribution channels. More about that soon.
Here is my chikan project so far.
The fabric is very transparent and shows off the shadow work, but I had to be careful because any untidy work on the back shows through to the front. The shadows in the photo below pick up some of the places where I have ended off the threads and perhaps worked over them too much when trying to keep them tidy.
I have enjoyed the SAL but it may be a while before my piece is completed. The family have arrived back to stay with us and I am a busy granny again.
The other happening here is that after three long years Rod has finished writing his book on Building Resilience, a self help book on improving your own personal resilience to cope with the difficult times. He has received the first copies from the printer and is setting up distribution channels. More about that soon.
Thursday, May 3, 2012
Just a little stitching
Just a quick post to let you know that life has been busy in the last few weeks, adjusting to having a baby in the house again after all these years. Now the family are away for a week visiting little Jake's Durban grandparents and I have time to catch up on other things.
On the stitching front, in between babysitting, I managed to make a little tracksuit for Jake which went off with him to Durban before I could take a photo for the blog. I have also made some progress on the Chikan stitch along organized by Anita on her blog Artistic Fingers and I will post a picture in the next few days.
Winter arrived with good rains last week. The garden looks so much better for the rain but with it the snails have come out and the plants are looking a little raggedy. I will have to persuade Rod to gather up his torch and go on a snail hunt with me just before we turn in tonight.
I hope your stitching is going well and if you are in the southern hemisphere that you are not finding it too cold yet.
On the stitching front, in between babysitting, I managed to make a little tracksuit for Jake which went off with him to Durban before I could take a photo for the blog. I have also made some progress on the Chikan stitch along organized by Anita on her blog Artistic Fingers and I will post a picture in the next few days.
Winter arrived with good rains last week. The garden looks so much better for the rain but with it the snails have come out and the plants are looking a little raggedy. I will have to persuade Rod to gather up his torch and go on a snail hunt with me just before we turn in tonight.
I hope your stitching is going well and if you are in the southern hemisphere that you are not finding it too cold yet.
Thursday, March 22, 2012
Chikan embroidery
If you are interested in whitework embroidery you may, like me, have come across a mention of chikankari or chikan embroidery. It is often mentioned in conjuction with discussions on shadow work and Dresden Lace embroidery because of the similarities between these types of embroidery.
Chikan originates from India and continues to be produced today, centred largely around Lucknow in the northeast. Dresden Lace is of European origin and is named after Dresden, Germany which was the centre for its production in the mid 18th century when this form of embroidery was at the height of fashion.
Both chikan and Dresden Lace are worked on very fine, sheer fabrics like muslin or voile. The transparency of the fabric is key to the delicacy and beauty of the embroidery because it shows off the shadow work to best advantage. Shadow work uses double backstitch or reverse herringbone stitch. It is found on both Dresden Lace and chikan and it forms a gentle contrast to the open lacy look of the pulled work embroidery that is worked along side it.
Dresden Lace uses a large variety of pulled work stitches and pulled work stitch combinations and it is this which creates its distinctive character. The small fragment below of an 18th century Dresden Lace neckerchief (or shawl) shows: chain stitch which has been used to outline the motifs; shadow work petals; and four different pulled work areas. Two of these areas are made up of combination pulled work stitches quite typical of Dresden Lace.
Chikan on the other hand generally includes a smaller variety of pulled work stitches but it has a wide range of surface stitches to complement the shadow work. Many of the surface stitches in chikan work are unique to Indian embroidery and are not seen anywhere else.
Recently Anita, of the blog artisticfingers, organized a chikan stitch along and I have signed up for it to learn more about this beautiful form of embroidery. So far I have found some cotton voile fabric and traced the design onto it. Below you can see the design pinned underneath the voile ready for tracing off and it gives you some idea of how sheer the fabric is.
I won't be doing much stitching in the next few months while my daughter and family are visiting, but I will post my progress on the SAL if and when I make any. In the meantime to all the other embroiderers taking part in the chikan stitch along, Happy Stitching!
Chikan originates from India and continues to be produced today, centred largely around Lucknow in the northeast. Dresden Lace is of European origin and is named after Dresden, Germany which was the centre for its production in the mid 18th century when this form of embroidery was at the height of fashion.
Both chikan and Dresden Lace are worked on very fine, sheer fabrics like muslin or voile. The transparency of the fabric is key to the delicacy and beauty of the embroidery because it shows off the shadow work to best advantage. Shadow work uses double backstitch or reverse herringbone stitch. It is found on both Dresden Lace and chikan and it forms a gentle contrast to the open lacy look of the pulled work embroidery that is worked along side it.
Dresden Lace uses a large variety of pulled work stitches and pulled work stitch combinations and it is this which creates its distinctive character. The small fragment below of an 18th century Dresden Lace neckerchief (or shawl) shows: chain stitch which has been used to outline the motifs; shadow work petals; and four different pulled work areas. Two of these areas are made up of combination pulled work stitches quite typical of Dresden Lace.
| Dresden Lace (Photo with kind permission of the owner D. Langham) |
Recently Anita, of the blog artisticfingers, organized a chikan stitch along and I have signed up for it to learn more about this beautiful form of embroidery. So far I have found some cotton voile fabric and traced the design onto it. Below you can see the design pinned underneath the voile ready for tracing off and it gives you some idea of how sheer the fabric is.
I won't be doing much stitching in the next few months while my daughter and family are visiting, but I will post my progress on the SAL if and when I make any. In the meantime to all the other embroiderers taking part in the chikan stitch along, Happy Stitching!
Sunday, March 18, 2012
Strawberry Print Smocked Dress
Just a quick post today. A little smocked dress that I made recently has been waiting for that finishing touch and this week I was inspired to make some bullion knot roses to set off the smocking.
I loved the cheerful strawberry print of the fabric and the almost Christmassy colours and somehow it was just right for smocking a little girl's dress. You can see more photos of it over on my Etsy shop.
I am expecting my daughter and family to stay next week and am madly tidying up my sewing room which will be little Jake's room for the next few months, so I expect not too much stitching will be happening. But what fun to be a granny and have a 1 year old in the house again!
I loved the cheerful strawberry print of the fabric and the almost Christmassy colours and somehow it was just right for smocking a little girl's dress. You can see more photos of it over on my Etsy shop.
I am expecting my daughter and family to stay next week and am madly tidying up my sewing room which will be little Jake's room for the next few months, so I expect not too much stitching will be happening. But what fun to be a granny and have a 1 year old in the house again!
Monday, February 27, 2012
Herringbone sampler framed
My little herringbone stitch sampler is done. It was inspired by the Stitch of the Month currently in progress at the Cape Embroiderers' Guild monthly meetings as well as The Take a Stitch Tuesday challenge on Pin Tangle. My idea was to put my sampler in a small 5"x7" frame so that it didn't end up lying around in a drawer and here I am trying it out in an old photo frame.
Mmm... no! It looks too squashed in. I think the embroidery needs a bit more space around the edges. So I take another family portrait out of its frame and lay it over the sampler.
This time I like the effect of the unworked linen around the edges. The embroidery seems to have more breathing space in the bigger frame.
The problem is that when I started the sampler, I was quite certain that it would go into a 5"x7" frame, so I drew a pencil line onto my linen - just beyond the 5"x7" perimeter where I thought it would be covered by the frame. Only now, I have changed my mind! I want to use a bigger frame and the pencil line shows. Its almost impossible to remove a pencil line - if you have any tips about this do let me know - so its onto plan B: a stitched border to cover the pencil line.
The same dark blue thread used in the sampler seems to work best to visually contain the stitches.
And stem stitch makes a neat line.
Finally, I laced the sampler onto a backing board and slipped it into a frame.
That little project didn't turn out quite the way I'd expected, but I did learn a valuable lesson, again. Do not use a pencil to mark your linen unless you are absolutely sure you will stitch over it. In future I will go back to tacking my outlines even if it does take a bit longer. A little patience in the beginning can save a lot of time later on, especially on larger projects and most especially when you are working on a fabulous linen fabric.
Happy stitching!
Mmm... no! It looks too squashed in. I think the embroidery needs a bit more space around the edges. So I take another family portrait out of its frame and lay it over the sampler.
This time I like the effect of the unworked linen around the edges. The embroidery seems to have more breathing space in the bigger frame.
The problem is that when I started the sampler, I was quite certain that it would go into a 5"x7" frame, so I drew a pencil line onto my linen - just beyond the 5"x7" perimeter where I thought it would be covered by the frame. Only now, I have changed my mind! I want to use a bigger frame and the pencil line shows. Its almost impossible to remove a pencil line - if you have any tips about this do let me know - so its onto plan B: a stitched border to cover the pencil line.
The same dark blue thread used in the sampler seems to work best to visually contain the stitches.
And stem stitch makes a neat line.
Finally, I laced the sampler onto a backing board and slipped it into a frame.
That little project didn't turn out quite the way I'd expected, but I did learn a valuable lesson, again. Do not use a pencil to mark your linen unless you are absolutely sure you will stitch over it. In future I will go back to tacking my outlines even if it does take a bit longer. A little patience in the beginning can save a lot of time later on, especially on larger projects and most especially when you are working on a fabulous linen fabric.
Happy stitching!
Saturday, February 18, 2012
Herringbone Stitch - Stitch of the Month
The Cape Embroiderers' Guild is going all out this year to encourage members to take part in it's Stitch of the Month programme. The idea is to challenge members to come up with a variety of variations of a particular stitch that they would not usually use.
Then the further challenge is to put the samples together in a special stitch reference file or book - the subject of a much anticipated upcoming workshop by Penny Cornell. I for one have dozens of little samples all over the show that I wish I had been disciplined enough to put together in one place where I could refer back to them when I need them, so the idea struck something of a chord.
February's Stitch of the Month is Herringbone Stitch. Over the years I have seen some wonderful variations and uses of the stitch, especially those tantalisingly pretty ones used for crazy patch. Have a look at Sharon Boggan's Blog on PinTangle, especially the Take a Stitch Tuesday challenge (TAST), for some beautifully presented inspiring stitches. My idea was to make a mini sampler of herringbone stitch variations and frame them in a simple ready-made frame so I can hang the sampler up on the wall in my sewing room without too much fuss and it will always be easy to find.
It wasn't long before I realised that I could probably fill at least three mini samplers with all the ideas I want to record! Anyway, here's my herringbone sampler in progress. It doesn't record nearly as many variations as I would like, but it is fun to do.
The last row in the above photo is my version of a variation that Mary Corbet shared on Needle 'n Thread. I just love the little French Knots on the silk ribbon. They remind me of little roses on a garden trellis.
For the project I challenged myself to use up fabric and threads in my stash - a fine dress-weight linen, a variegated Anchor thread (that turned out rather brighter than I'd expected), little lengths of DMC stranded threads I couldn't bear to throw out and a small length of green silk ribbon. I decided that I would work to a 5"x7" (12.5cm x 18cm) standard size photo frame and I was set to go, stitching row by row as I found another Herringbone variation wanted to record.
Can you spot the mistake I made when setting out the project? A clue is that I now want to use a larger photo frame. I have enough fabric along the edges of the sampler to do so, but...
Then the further challenge is to put the samples together in a special stitch reference file or book - the subject of a much anticipated upcoming workshop by Penny Cornell. I for one have dozens of little samples all over the show that I wish I had been disciplined enough to put together in one place where I could refer back to them when I need them, so the idea struck something of a chord.
February's Stitch of the Month is Herringbone Stitch. Over the years I have seen some wonderful variations and uses of the stitch, especially those tantalisingly pretty ones used for crazy patch. Have a look at Sharon Boggan's Blog on PinTangle, especially the Take a Stitch Tuesday challenge (TAST), for some beautifully presented inspiring stitches. My idea was to make a mini sampler of herringbone stitch variations and frame them in a simple ready-made frame so I can hang the sampler up on the wall in my sewing room without too much fuss and it will always be easy to find.
It wasn't long before I realised that I could probably fill at least three mini samplers with all the ideas I want to record! Anyway, here's my herringbone sampler in progress. It doesn't record nearly as many variations as I would like, but it is fun to do.
The last row in the above photo is my version of a variation that Mary Corbet shared on Needle 'n Thread. I just love the little French Knots on the silk ribbon. They remind me of little roses on a garden trellis.
For the project I challenged myself to use up fabric and threads in my stash - a fine dress-weight linen, a variegated Anchor thread (that turned out rather brighter than I'd expected), little lengths of DMC stranded threads I couldn't bear to throw out and a small length of green silk ribbon. I decided that I would work to a 5"x7" (12.5cm x 18cm) standard size photo frame and I was set to go, stitching row by row as I found another Herringbone variation wanted to record.
Can you spot the mistake I made when setting out the project? A clue is that I now want to use a larger photo frame. I have enough fabric along the edges of the sampler to do so, but...
Thursday, February 9, 2012
Stitched Felt Ball - tips
In my last post I showed you the start of my little felt ball project. I found the pattern in the book by Margaret Hutchings called Modern Soft Toy Making.
This was the kit I assembled ready for stitching on the plane during my trip to Bangkok. I pre-cut lengths of thread and wound them back onto their spools so that I didn't need to carry scissors with me on the flight. Any trimming of threads would be done afterwards as I have never got around to buying one of those nifty thread cutters that pass airport security checks.
It is a straightforward project, but it does need a little extra care to make sure the 8 points meet up neatly at either end of the ball. Here's how I made the ball and some tips that I found useful.
1. Cutting out: Cut out the felt pieces accurately!
2. Starting (and ending) a seam
Work out where to start and end each seam and do it as accurately as you can. To do this, decide on your seam width. Then picture where the seam lines of the segment would cross. For example, the starting point for the segment pictured here would be at A, exactly. (I'll refer to "point A" again later when new segments are added.)
Start at A with a few secure back stitches. I used a small knot as well for extra strength. Stitch to the end of the seam and picture exactly where the two seams would cross and end on this point. Whatever you do, don't stop short of the end point, finish on it. Backstitch the end securely. I also take a few stitches back long the seam before I cut off my thread.
3. Stab stitch: I stitched the first two segments together using a tiny stab stitch and a 2mm seam width. I check the placement of each stitch on the front and the back as I go along for a neat seam.This is because the felt is quite thick and it is easy for the needle to come out at a slight angle and be way off of your 2mm seam-line.
To check the placement of each stitch: Insert the needle 2mm from the edge on the front of the work, then turn the work over and make sure that the needle emerges 2mm from the edge on the back of the work and pull the thread through.Then still looking at the back of the work, put the needle into the felt 2mm from the cut edge, and as the needle comes through make sure it comes out 2mm from the edge on the front and pull through.
I also pull each stitch quite firmly so that the stitches are pulled down slightly into the felt. This way they don't show along the seam when the ball is turned right side out.
4. Adding another segment:
Place the next segment against your work right sides together. Carefully check that the end points match up exactly with the piece underneath. Use one or two pins to hold the two pieces together. Now check again that the end points match. If one piece protrudes beyond the other, ease the pieces together until they match exactly at both ends.
To get a good start here, I found it useful to slightly lift the new segment so I could see to bring the needle up at point A (on the green segment below). Notice that point A is now at the join between the two already joined segments.
Then insert the needle into point 'A' on the new segment. Back stitch and continue carefully for a few stitches. Look on the inside of your work and if you are not satisfied with the start, now is the time to unpick! See how the green piece seems to fit into the two blue segments. This is a good join. Remember to picture where the seam lines start and end, and be accurate when you start and end your stitching.
Add segment four in the same way.
This completes half of the ball.
5. The best tip I got while making the ball was to make up the ball in two halves. Its much easier to join two halves of the ball than to keep trying to add on segment by segment. I once tried to keep on adding segments until it got impossibly fiddly and the result was a mess. Joining two halves gives a much better finish and is easier to manage. Here is the other half as I'm joining on the 4th segment.
Now join the two halves.
The important thing here is to carefully match the end points of the seams and stitch the joins at the top and bottom of the ball accurately. Keep looking at the inside of the work to see if the points are matching up neatly.
Watch that those end points match up. Did I say this before?!
Leave about 1/3 of the seam open in the centre portion of the last seam. To do this you will have to stitch from each end towards the middle and end off about 1/3 of the way along.Now turn the ball right side out and fill with stuffing. I used foam chips. The bag of stuffing below is enough for 2 balls. If you pack them in firmly, the ball will have some bounce to it.
Finally I used a ladder stitch to close up the opening.
Enjoy making your own felt ball. It's a lovely gift for a 1 year old.
This was the kit I assembled ready for stitching on the plane during my trip to Bangkok. I pre-cut lengths of thread and wound them back onto their spools so that I didn't need to carry scissors with me on the flight. Any trimming of threads would be done afterwards as I have never got around to buying one of those nifty thread cutters that pass airport security checks.
It is a straightforward project, but it does need a little extra care to make sure the 8 points meet up neatly at either end of the ball. Here's how I made the ball and some tips that I found useful.
1. Cutting out: Cut out the felt pieces accurately!
2. Starting (and ending) a seam
Start at A with a few secure back stitches. I used a small knot as well for extra strength. Stitch to the end of the seam and picture exactly where the two seams would cross and end on this point. Whatever you do, don't stop short of the end point, finish on it. Backstitch the end securely. I also take a few stitches back long the seam before I cut off my thread.
3. Stab stitch: I stitched the first two segments together using a tiny stab stitch and a 2mm seam width. I check the placement of each stitch on the front and the back as I go along for a neat seam.This is because the felt is quite thick and it is easy for the needle to come out at a slight angle and be way off of your 2mm seam-line.
To check the placement of each stitch: Insert the needle 2mm from the edge on the front of the work, then turn the work over and make sure that the needle emerges 2mm from the edge on the back of the work and pull the thread through.Then still looking at the back of the work, put the needle into the felt 2mm from the cut edge, and as the needle comes through make sure it comes out 2mm from the edge on the front and pull through.
I also pull each stitch quite firmly so that the stitches are pulled down slightly into the felt. This way they don't show along the seam when the ball is turned right side out.
4. Adding another segment:
Place the next segment against your work right sides together. Carefully check that the end points match up exactly with the piece underneath. Use one or two pins to hold the two pieces together. Now check again that the end points match. If one piece protrudes beyond the other, ease the pieces together until they match exactly at both ends.
To get a good start here, I found it useful to slightly lift the new segment so I could see to bring the needle up at point A (on the green segment below). Notice that point A is now at the join between the two already joined segments.
Then insert the needle into point 'A' on the new segment. Back stitch and continue carefully for a few stitches. Look on the inside of your work and if you are not satisfied with the start, now is the time to unpick! See how the green piece seems to fit into the two blue segments. This is a good join. Remember to picture where the seam lines start and end, and be accurate when you start and end your stitching.
Add segment four in the same way.
This completes half of the ball.
5. The best tip I got while making the ball was to make up the ball in two halves. Its much easier to join two halves of the ball than to keep trying to add on segment by segment. I once tried to keep on adding segments until it got impossibly fiddly and the result was a mess. Joining two halves gives a much better finish and is easier to manage. Here is the other half as I'm joining on the 4th segment.
Now join the two halves.
The important thing here is to carefully match the end points of the seams and stitch the joins at the top and bottom of the ball accurately. Keep looking at the inside of the work to see if the points are matching up neatly.
Watch that those end points match up. Did I say this before?!
Leave about 1/3 of the seam open in the centre portion of the last seam. To do this you will have to stitch from each end towards the middle and end off about 1/3 of the way along.Now turn the ball right side out and fill with stuffing. I used foam chips. The bag of stuffing below is enough for 2 balls. If you pack them in firmly, the ball will have some bounce to it.
Finally I used a ladder stitch to close up the opening.
Enjoy making your own felt ball. It's a lovely gift for a 1 year old.
Subscribe to:
Posts (Atom)