Sunday, December 20, 2020

Christmas angels

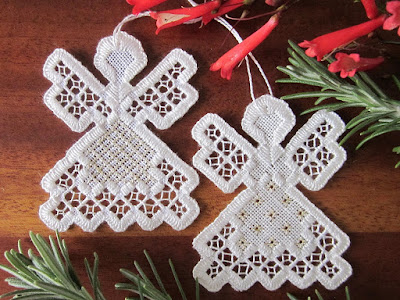
I used a few minutes here and there and finished stitching these little Christmas angels, ready for their new owners. 

There was a hint in my last post here about what I was stitching. I wonder how many of you recognized the Hardanger angel designed by Rita Tubbs. It's such a sweet little pattern.

On the 28 count (i.e. 28 threads per inch) Zweigart linen I used, I found a number 5 DMC Pearl thread a bit too thick for the buttonhole edge and the Kloster blocks. So I used a Pearl number 8 thread instead. A metallic, gold, Madeira thread gives the skirts a little sparkle. The Dove's eye's are done with DMC Pearl number 12. 

When all the stitching was finished, I found my sharp pointed scissors, took a deep breath, and cut, working from the back of the embroidery. That cutting out at the end is always a bit stressful - just in case you snip a thread that shouldn't be cut. But this time all went well.

That's one more thing I can cross off my Christmas to do list. Now I have a few more presents to wrap.

In my next post I'll have an interesting story and an interesting piece of pulled thread work to show you. It was embroidered by my stitching friend Tricia. Until then I will be taking a low-key break over the holidays. 

Wishing you well over Christmas and the festive season. May next year be a better one for all of us.

Thursday, December 10, 2020

A little Christmas stitching

Towards the end of November, I came across a charming Christmas To Do/Bucket List on Canadian Needle Nana's blog. Suddenly the penny dropped that Christmas was hurtling towards us and I hadn't given it much thought. It was time for my to do list. And I wanted to make one small embroidered gift, but more about that below.

The grandchildren helped put up the Christmas tree this week. It was well worth waiting for them to come over and do it with us. The lights had to go up first and were switched on straight away. Already there was a Christmassy atmosphere. Then the ornaments were unpacked. There was some disappointment when the ornaments made by the Dubai cousins were unwrapped and we explained that they couldn't come for Christmas this year. That's because Australia's borders are still closed to international travellers due to our Covid restrictions. 

It was a rainy afternoon and sorting out the tree and the decorations kept us all busy: trying on the very long string of gold beads; walking round and round the Christmas tree wrapping it in beads and then fat strands of tinsel; and finally examining the decorations before hanging them up one by one. It was the perfect rainy day activity. It was the first rain in six weeks and very welcome, especially as we were in the middle of a ten day heatwave. 

Christmas presents were next on my to do list and there Google was a boon. I have spent quite some time doing the shopping - all online so far. It's way too easy to click that pay now button! The postie will have a heavy bag when he gets to our house. I hope he arrives with all the parcels before Christmas otherwise I might be handing out IOU's instead of giving presents this year.

That little stitched gift is for kind in-laws who have invited us for Christmas lunch. You may recognize the first steps in the photo below. Yes, it's Hardanger. I have made several over the years and given them all away. This year I had to ask my daughter to lend me hers - off of her Christmas tree! - to remind me how to do it. It's almost half way and should be finished soon. Then I have three family birthdays to think about in the next two weeks!

How ever you will be spending Christmas at the end of this extraordinary year, I hope you are making good progress with your Christmas to do list, and enjoying yourself along the way.

'Till next time, happy stitching!

.............

P.S. I wonder if other bloggers are also stumbling along with Blogger's changed formatting and the photo quality? I've gotten used to some of the changes but seem to come across another challenge each time I put up a new post. Perhaps there are new changes being applied every couple of weeks?


Wednesday, December 2, 2020

My Cushion is on my Grandmother's chair

The twenty leaves I set out to stitch for the Leaf Sampler stitch along have been waiting to be made up into a cushion cover. And finally, it's finished! You can read more about the SAL in previous blog posts by clicking on the links below.

Leaf SAL Begins

Leaf SAL- Up and Down Buttonhole Stitch

Leaf SAL - 10 Leaves

Pentas, Embroidery and Caterpillars

Leaf SAL - Sixteen Leaves

Leaf SAL and August Weather

To complete the embroidery, I added my initials and date, as well as "Covid-19" as a record that I stitched it during lockdown of this topsy-turvy year. I disguised the lettering a little by surrounding it with a leaf shape.  It's rather squished in but then the leaves are supposed to be scattered randomly anyway. Aren't they? 

I framed the leaves with a row of stem stitch. Then I carefully washed out the blue disappearing ink I'd used liberally to mark the lines, and the spacing of some of the more tricky stitches. 

I didn't want to iron the stitches flat. Instead, once the embroidery was dry I pinned it onto a cork board, making sure it was square, and sprayed it with water to damp stretch it. 


That pinning and stretching does take a bit of time and patience but it gives the embroidery a lovely finish without the need for any ironing.

The chair the finished cushion stands on is rather special to me. It belonged to my grandmother. She lived in Kimberley, South Africa towards the end of the diamond rush. There she was chairman of the Women's Temperance Union and when the family left to go farming in Potchefstroom, she received a pair of chairs as a farewell gift from the members. This chair was rescued and painstakingly restored by my father very many years later.

I would love to have met my grandmother. She raised seven children, worked with my grandfather on their dairy farm, played the organ in church on Sunday, painted in oils, hand knitted socks, and every now and then would be asked to load her piano on the ox wagon, cross the river into town and provide the entertainment at the local fete!

I wonder what my grandmother would have said about her chair being shipped across the ocean and now standing in my entrance hall in Australia, far from it's original place at the table in the old farm kitchen.

'Till next time, I hope you are well, do keep safe and carry on stitching.

Tuesday, November 24, 2020

Stick to the Pattern or Ring the Changes?

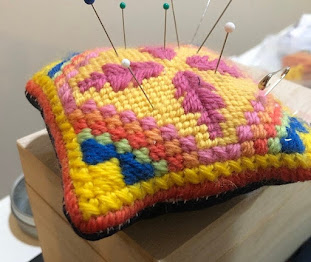
This sunny, cheerful pincushion was stitched by Jennifer Costa and it was her first canvas work project. She started with the Leafy Green canvas work pattern. Then she exercised her imagination and changed the colours that the pattern suggested, using the threads she had to hand. Jennifer also adapted the pattern by making her version of the pincushion smaller and leaving off the outer border.  

canvas work pattern
Leafy Green Pincushion Pattern as adapted by Jennifer Costa 

It's rewarding when someone takes an embroidery pattern and changes it to match up to their vision of what it could be, or the materials they have in their stash. It's satisfying to both the embroiderer, who uses their creative talents and sees the concrete result of their efforts and ideas, and it's also gratifying to the designer to learn that the pattern has brought inspiration, enjoyment and success to the stitcher.


The Leafy Green pattern for the pincushion was originally designed by my friend Beryl Saunders in muted greens and blues. But, there is no reason why you have to stick to the suggested palette. Choose colours to suit yourself, colours that you already have, or colours to match your sewing accessories or your decor. Best of all simply stitch with your favourite colours and enjoy them as you work. 

The colours can be bright and cheerful, cool and calming, fashionable or even seasonal. The leaves in the centre of Beryl's design resemble prickly holly leaves, so try Christmassy greens and reds and it could become an ornament for the Christmas tree. 

The pattern is available as a digital download in my Etsy shop.  Click on the blue button below to visit the shop.

The only question now is, Will you stick to the pattern or ring the changes? Whatever you decide, 'till next time, happy stitching!


Friday, October 9, 2020

Dainty Hardanger

I was looking through my cupboard for some inspiration when I found these little Hardanger treasures. Most of the small embroideries I do are given away, but these I couldn't part with.

Some years ago I was fortunate to do classes with Lynne Laver of Fish Hoek, a popular seaside town in Cape Town. Lynne designed the most intricate and beautiful Hardanger pieces. Turn this little sachet over and you are in for a surprise.

The embroidered back is quite different. And it is smaller than the front. It's the front that forms the see-through lacy edge.


The blue needlecase and tiny pincushion have a delicate edge stitched with DMC cotton sewing machine thread. The challenge for me was all those picots. It was also the first time I used a coloured thread for Hardanger rather than the traditional white on white.


Talking of colour, the scissor keep and pincushion were embroidered with a space-dyed thread by Chameleon. Rather than detracting from the embroidery, the soft coloured thread complemented the dainty Hardanger stitches very well.


There was nothing predictable about the reverse side of Lynne's scissor keep pattern either. I'd been wanting to try out that stitch in the centre of the kloster block for some while and here was the opportunity. 


The triangular piece at the top of the scissor keep folds down to keep the scissors in place. I still have to find a pretty pearl button the correct size for the fastening. 


Somehow I know I will never actually use any of these. I just enjoy looking at them when I come across them in the cupboard. Perhaps you have treasures like that too?

I hope you are keeping well and safe. Enjoy your weekend and happy stitching!


Tuesday, September 22, 2020

A New Pulled Thread Book - in French

I received a dictionary of pulled thread stitches for my birthday last year. Unfortunately for me, it's written in French. The languages I studied at school were Engish, Afrikaans and Latin. I don't speak a word of French. Or Latin.

The first thing anyone says when I mention that the book is written in French is 'Just use Google Translate.' And certainly, I found the translations useful. It's when I got to the technical terms that things became less clear. One translation amused me. After all, does one really use 'wire' for pulled thread embroidery? I did sort that puzzle out pretty quickly though.

Mary Corbett's review of a needlelace book, translated from the original French, alludes to the tricky question of translating specialized embroidery terms in a meaningful way. I can see now that not only is a bilingual person required for the translation, but preferably one who is familiar with all the very specific terms too. You can see Mary's comments in her blog post here.  Anyway, overall, I think I got a fair sense of what the text in my new book is covering.

The book itself is beautifully designed and a pleasure to page through and study. The graphics are clear and self explanatory. There are also diagrams of how the back of each stitch should look which is useful for making sure that you are working the stitch in the correct direction and the right sequence of the steps. The depth of information and care with which it is presented is remarkable. I'm just sorry that my photos don't do it justice.

The book covers the basic pulled thread stitches beginning with Satin stitch, goes on to Four-sided stitch, and includes Wave stitch, Faggot stitch and a few others. There are also many variations of these basic stitches, together with a photo of the stitched example. Finally there are combination stitches also with beautifully embroidered stitch samples.

The book Jours fils à resserrés by Marie-Helene Jeanneau was published in 2019 by Neva. Sadly Marie-Helene passed away the previous year. The book is labelled Volume 1.  How I would love to have seen what she had planned for Volume 2. 

Although I got the gist of the book and the stitch diagrams were clear and easy to follow, I would still like to be able to accurately interpret every word.  I think there is a wealth of useful information and technical know-how tucked away in those (to me) unfathomable French terms. 

I contacted the publisher to enquire about an English version of the book. He did say that there was an intention to translate it at a future date, and that it may be published by another publisher. I'll keep a lookout for that.

'Till next time, happy stitching!


Thursday, September 3, 2020

Leaf SAL and August Weather

August in Brisbane was windy. Very windy. The wind blew all the washing off the line on Monday.  Pehaps that's a reminder to use the pegs. We had a few days of dust storms too, when the skies were pink from morning till night with the dust blown in from the inland desert areas. You could taste the dry dust in the air, even inside the house. A little rain is forecast for the weekend. I hope it arrives.

My leaf SAL is almost done. The leaf of chain and French knots was one leaf that went fairly quickly -

once I'd settled on the colours. With each new leaf choosing the colours became more of a challenge. One consideration was that I wanted to avoid having clumps of a single colour all congregated in one small area of the embroidery. Sometimes the colours I had planned just didn't look right so I unpicked and changed them. 

Deviating from the suggested scroll stitch as an outline for my next leaf, I chose Portuguese knotted stem instead. Up close, I really like the way the knot pulls the two threads together and almost looks like a rope. For tying down the lattice filling I wanted the crosses to stand out. Eventually I took out the contrasting pink and settled on a close matching colour after all.


My final leaf is filled with interwoven cross.


What I found interesting while working on the SAL is that stitches that looked uninspiring to me when paging through stitch dictionaries, turned out to be quite intriguing when I stitched them. Interwoven cross was one of them. Doing that last little tug on the thread and seeing how the threads entwined was rather satisfying. But also, the random sprinkling of the crosses as a filling stitch reminded me at times of a star-studded sky, and at other times, a sparkling field of wild flowers. Interwoven cross is a pretty little filling stitch.

My goal of twenty leaves is done. I'll make up a cushion cover once I find a cushion inner and know what size to make it.


In case you're wondering about that big frame, it's a quilting frame. I used it only to stretch out and smooth the wrinkles in the embroidery so I could photograph it before it's been washed and ironed.

Thinking of the weekend and some spring rain reminds me that the pelargonium and the bromeliad in this pot suddenly sprang into bloom. Longer days and warmer weather is definitely on the way here. 


'Till next time, happy stitching!


Thursday, July 30, 2020

Leaf SAL - Sixteen leaves

In my last four blog posts, I have been sharing my Leaf Stitch-Along journey. The SAL was arranged by the Embroiderers' Guild Queensland during the Covid-10 restrictions and stay at home orders. These are the leaves I have embroidered so far.


Some I have enjoyed stitching enormously, others have been a challenge. Here's one that amused me no end - Butterfly Chain. It starts off with a line of straight stitches, three to a group. 


The Chain Stitch is added afterwards. It's detached. It lies on top of the fabric, tying the groups of stitches together to form a string of butterflies. And it makes a very pretty line stitch. 


Yet for me the butterflies disappeared, and all I could see was a fish bone!

Then, Twisted Chain Stitch sprang to mind, and I surrounded the fish bone with little fish of Twisted Chain Stitch. I'm still deciding if those will stay.


Other fillings seemed more mundane. I thought a Brick and Cross filling made up of staight stitches and crosses would be straightforward, and quick. But, I unpicked it five or even six times. First, I chose a variegated thread so that the densely worked filling would look lighter. Mmmm... 


After a few attempts and three determined rows I conceded that it simply looked splotchy. 

Then, with plain blue thread, I kept changing the spacing until all the lines looked more equally sized and spaced. 


The result is quite different to what I had expected. In the end, it's a filling that I am rather pleased with.


I have four more leaves to do to reach my goal of twenty. It's been an interesting journey so far. 

On another note, I hope you are able to enjoy doing some stitching today, Thursday 30 July, World Embroidery Day. You will be in the good company of very many embroiderers stitching all around the world.

'Till next time, happy stitching!


Monday, July 20, 2020

Pentas, Embroidery and Caterpillars

The pentas in my garden are still blooming after almost three years. They look a bit untidy, yet I haven't had the heart to prune them back hard because they always have flowers on them. I love the deep red flowers and that bush is suddenly full of buds about to burst open. It's lovely to have colour in the garden in the middle of winter.


Indoors, my SAL leaf sampler is growing. But it's one particular leaf I want to tell you about. The outline is Interlaced Cable Chain. I like the way the green interlacing thread lies neatly on the outside of the yellow cable chain. I followed the SAL instructions and placed a French knot in the centre of each chain. 


Early on I decided that seeing as though I did not have the threads specified with the SAL instructions, I'd simply choose bright cheerful colours from my stash of threads. With that in mind I chose a nice bright contrasting red for the French Knot inside the Interlaced Cable Chain. And those red spots do stand out. Unfortunately the result reminds me of a caterpillar! 

Not just any caterpillar, but the plague of hawk moth caterpillars that we had on the pentas during the summer. For weeks on end, Rod and I collected by hand anything from ten to fifty caterpillars each day on the six plants in the garden. It's a mystery where they all came from because I only ever saw one hawk moth in the garden and never any eggs on the plants.

Lots of birds visit the birdbath next to the pentas and I was reluctant to spray. As summer wound down we finally gave up, sprayed with an eco-friendly mixture, and it was a relief not to have go out each day and hunt for those destructive caterpillars. Yesterday, for the first time in months, I found a lonely caterpillar - the size of my little finger! I guess more will soon be back. 


Sunday, July 5, 2020

Leaf SAL - 10 leaves

In my last post here I showed you the first of the leaves I'd been doing for the EGQ Leaf Stitch-Along project. Each leaf has a stitch outlining it and a centre filling with suggestions listed for variations. In that vein, I have taken a bit of liberty with some of the leaves and chosen different stitches. Others are waiting for inspiration. In the meantime these were my first 8 leaves.


Learning the more complicated stitches and doing them on the curve of the leaf has been challenging. I can see why they are usually demonstrated on an evenweave fabric which is particularly suited to someone learning the stitch. It does make the spacing much easier when you can place stitches in a straight line and a set number of threads apart.

So, it was nice to do a simpler outline of detached chain with two straight stitches in between. I wasn't looking forward to the buttonhole wheels, but they went more smoothly than I expected. 


Below I have added a further 2 leaves to my sampler, bringing the total to 10. Both the outline stitches  for these two leaves were new to me and rather interesting to learn.


Like me, one of the very first stitches you may have learnt to embroider is chain stitch. How about spicing it up, adding in a straight stitch, and trying Spine Chain Stitch? That sounds simple enough.


Well my version didn't quite turn out the way it should have. It's got spines on one side only, but that was an intentional variation. What wasn't intentional, is that the spines point in the wrong direction. Oops!

If you angle the straight stitches correctly, as shown below, with the spines worked back towards the beginning of the line, they stand out quite distinctly. 


Spine chain stitch - single sided variation

But, if you angle the spine in the direction in which you are travelling, it becomea partially covered by the next chain stitch. And that's why my spines seem to disappear under the chain. For now, I rather like the less spiky effect, so I have left it just like that. It's also a reminder to me of how not to do it in future.

Then I moved on to another variation of chain stitch. For most of the SAL stitches I have used Mary Thomas' Dictionary of Embroidery Stitches. 


I like the single clear diagrams that illustrate how to do the stitches. However, for Hungarian Braided Chain I had to look elsewhere. It's a tricky stitch. I needed to see specifically how to handle the needle and what to do with the thread. 

Mary Corbett's video that you will find in her post here is very good. It shows clearly just how the chain must be left loose as you begin the next stitch, and then exactly how and when to tighten it. I watched the video a number of times, each time noting and learning something else about the movement.


The finished effect is a neat looking, heavy chain. I imagine it would look perfect embroidered on a smart military uniform. I wonder if it is used anywhere for that purpose?

Next time I'll show you how I am progressing on the final set of 10 leaves comprising past 3 of the SAL.

'Till then, take care and happy stitching!