Tuesday, December 19, 2023

Christmas 2023

The Christmas tree is up with help from my grandchildren and my daughter. All the decorations have been unpacked and hung in place, and my Christmas angel is on the top. 


This sweet angel was embroidered on felt as recommended by Tricia Elvin-Jensen who had stitched a similar one. It's rewarding to stitch on felt because the stitches show up so clearly. I was pleased with how the angel's ringlets turned out. It was my first attempt at such l-o-o-o-n-g bullion stitches.

This will be my last post before Christmas. There's just a few days to go and there are still Christmas presents to think of, wrapping to do, and some baking I want to finish before Christmas Eve. 

I hope you have a peaceful and joyful holiday season and wish you a very Merry Christmas. 

'Till next time, take care and if you have a few spare moments, happy stitching too!


Tuesday, December 5, 2023

Hardanger Sample

There's a pretty Hardanger stitch that I've been meaning to try out.  I had prepared the block ages ago and cut and removed the threads ready for the filling. During the dark damp weather over the last week I tried the stitch. I like the slight curvy arms of the big cross in the centre.


There are two separate bars for each arm of the centre cross. A bar is woven over one and under one fabric thread. You can see the individual threads in the unworked corner in the photo below. 


In the beginning working on those single threads felt flimsy. But once the weaving was done it seemed reasonably sturdy, bearing in mind that any form of cutwork does make the embroidery more fragile.


The smaller crosses in the corners of the block are a variation of Dove's eye stitch. Each of the four blanket stitches that usually form Dove's eye, has one an extra wrap. The result is a more distinctive upright cross. I need more practice to get that tension right.


By comparison the lace fillings on my old sample below are the traditional Dove's eye stitch, that is more commonly found on Hardanger embroidery. You can recognize it by the open diamond shape in the centre of the cross.


I like the way the big cross turned out. It's a pretty stitch for a pincushion.


Till next time, happy stitching!


Friday, November 24, 2023

Christmas Craft Fair

If you're in and around Brisbane on Sunday, you'll find lots of lovely hand embroidered gifts for sale at the Queensland Christmas Craft Fair. Shop too for second hand craft materials - including fabric, thread, embroidery hoops, lace, ribbon, books, patterns and much more.

Further information about the Craft Fair is available on the Guild's website here.

Thursday, October 12, 2023

Lovely Whitework

I find whitework fascinating. It's a broad term that includes both counted thread work and surface embroidery techniques and covers many different types of embroidery worked mainly with white thread on white fabric.

If you enjoy seeing the whitework that other embroiderers are doing, below are some links that I have happily visited - more than once! 

1. Yolande has stitched a beautiful English Whitework band sampler designed by Darlene O'Steen. There are lots of photos and there is an English translation included on her blog Fils et Aiguilles une Passion. Click here to visit Yolande's blog and see the sampler.

2. At the beginning of the Covid pandemic, Luzine Happel came up with the idea of creating a joint Schwalm sampler and she proposed the idea on her blog. The result was that 74 embroiderers from 14 nations contributed 91 Schwalm embroideries, all stitched during Covid. These embroideries have been expertly combined into an extraordinary hanging. There are photos of the final piece and meticulous details of what went into making it on Luzine's blog here. There is an option for translating between German and English on the home page of the blog.

3. The Gary Parr interview on Fiber Talk Stitch Hour with Tricia Wilson Nguyen on 16th century whitework has some very interesting snippets. It's a 90 minute video and there are some technical problems, but there's much to glean from the details Tricia unearthed while studying old whitework samplers. The link will take you to the YouTube video here.

4. Mary Corbett alerted me to Janna Jackuszewska's cutwork patterns in her blog post here on Needle 'N Thread. Joanna is from from Poland and conveniently makes her cutwork patterns and copies of her magazines Haft Richelieu available for us in her Etsy shop KIZI MIZI StudioVisit Joanna's shop here.

Have fun browsing all this beautiful whitework. 

And happy stitching too!


Friday, September 8, 2023

Back of the embroidery - travelling threads

In her blog post of 6 September, Mary Corbett talks about the back of embroidery, specifically the back of something like a tablecloth where the back remains exposed. Although you don't see the back when the tablecloth is laid out on the table, there are times when the back is visible. The question is just how much attention should you pay to the back while you are stitching. 

You can read Mary's post here where she suggests a nice balance between keeping the back neat but not going overboard and spending too much time on it. Her tip for managing travelling threads by using an embroidered path on the back holds true for any type of embroidery. 

Cupcake pot holder

When considering how neat the back of an embroidery should be, take the type of fabric into account - whether it's a close weave or an open weave. I wrote previously about moving between pulled thread stitches on an open weave linen. Random threads across the back of the embroidery that show through to the front distract from the regularity of the counted work. Here's a link my blog post about how to minimize any show-through to the front of the piece by keeping a constant rhythm to the stitches.

The back does matter and it's worth thinking about how much the travelling threads on the back will show through to the front - whether it's surface embroidery with coloured threads like my cupcake pot holder, Mary's little tablecloth, or whether it's pulled thread work with white thread on white fabric. 

Unless you are entering a competition, I think the back must be neat but it does not have to be perfect. Control travelling threads either by keeping a pattern or rhythm to the movement from one stitch to the next, or as Mary so clearly illustrates, by following a path on the back that's already been stitched.

'Till next time, happy stitching!


Monday, August 28, 2023

RSN Tutor in Brisbane

I had a lovely afternoon at the guild on Saturday. It's not often I get to a meeting and this one was really special. Sally Randle gave us an illuminating insight into her three years at the Royal School of Needlework.  She trained as a tutor at the RSN headquarters in Hampton Court Palace, London and has recently returned to Brisbane to teach embroidery.

Several beautiful embroideries of different techniques such as crewelwork, canvaswork, blackwork, whitework and goldwork were on display. All were accompanied by detailed workbooks. These included the design ideas, thread samples, stitch samples, records of the project's requirements and finally the evaluations. Also noted were the hundreds of hours each project took to complete! Catch a glimpse below of Sally at work over her embroidery frame at the RSN.

Besides her own embroidery, Sally was fortunate enough to be in the right place at the right time and have the unique experience of working with the RSN team on some of the embroideries for King Charles and Queen Camilla's coronation. How amazing was that?!

Visit Sally's website here to find out more about her new studio and the classes and services she offers. You can also see more about an upcoming RSN Christmas class, suitable for everyone including beginners, that she will be teaching in person here in Brisbane. I've no doubt you will be in good hands.

'Till next time, happy stitching!

 -----------------------------------------------

Photos courtesy of Bryna Black from the media team of the Royal School of Needlework

Sunday, August 13, 2023

The back of the Embroidery

This is the back of my Daisy Band Sampler Pincushion. There was quite a lot of unpicking on that daisy row because I wanted a sequence that I could repeat all across the row and keep the back looking uniform. Below you can see how the thread enters and leaves each eyelet in the identical way. (Those little fluffy threads on the lower edge of the band of diagonal cross filling were snipped off when all the stitching was finished.)

Because the fabric used for pulled thread is usually a more open weave, threads carried across from stitch to stitch on the back may show through to the front. Any haphazard stitching on the back can often be picked up and it detracts from the finished embroidery. You can check for this by placing the embroidery over a dark background. It's then easy to make sure that no threads are either showing through holes or where they are noticeable and look untidy.

On some types of embroidery where the fabric is more closely woven, it's quite acceptable to carry thread across short spaces, but with pulled thread a little more care is a good idea. For neat pulled thread work it's important to keep a rhythm or regular pattern to the stitches. Each stitch should be worked in the same sequence, and pull in the same direction. 

Daisy Band Sampler Pincushion

Here's the finished embroidery. You can see more about the Daisy Band Sampler Pincushion in a previous blog post here.

Co-incidentally just after I finished writing this post, I listened to the latest interview with Yvette Stanton on Fiber Talk. Yvette and Gary discuss how useful it is to look at the back of the embroidery, not to check how neat it is, but to see exactly how the stitch was worked. There's a lot to learned on the back. 

'Till next time, happy stitching!

Friday, July 28, 2023

Loose Ends helps finish projects

An unusual service called Loose Ends was started by two friends Masey Kaplan and Jen Simonec. After unsuccessfully trying to find a service to complete unfinished knitting or sewing projects for friends who'd lost their mothers, they started one.

Unfinished embroidery from a DMC kit "Victorian Gardens - Leaf Collage"

I've seen many unfinished embroideries donated to embroidery guilds from deceased estates. I can imagine how satisfying it might have been both to the embroiderer and a volunteer to complete one of these embroideries while the embroiderer could still enjoy it.

Masey and Jen have now had over 600 projects completed by volunteer crafters. They carefully match the skills of these volunteers with unfinished projects for those who are unable to finish the projects due to age or illness. What a lovely idea! 

You can read more about Loose Ends on the National Public Radio website NPR, here.

Apologies to some of my readers. I've had a little trouble sending out notice of my new blogposts to everyone on the mailing list. I hope to sort it out soon.

'Till next time, happy stitching.

Sunday, July 9, 2023

Winter sunset

 We've had some lovely sunsets again. I went down to the bay at 5pm and low tide.


It had been a very gloomy day. There was hardly anyone walking along the promenade, just a jogger and a dog walker. It was just too cold for the usual bustle, but very pretty with the sunset reflecting off the shallow water on the mudflats.

Friday, June 9, 2023

Pastel Candies

Finding a name for my latest pincushion that I first wrote about in this blog post here started with some flashes of memory. 

These soft Paterna wool colours so reminded me of candy floss. Candy floss and the days spent in the sun eating big swirls of freshly made candy floss on sticks on Durban's South Beach. No photos of that  candy floss, but I did come across this very old photo of Durban South Beach with its golden sand, gorgeous blue rolling waves and the Bluff in the distance.

Durban and the old South Beach* 

That jogged a memory of the wonderful beach holiday I had in Hermanus with my cousins. Each day we could choose either ice cream or a selection of penny sweets to spend our carefully guarded our pocket money on. Usually we would choose from the tempting display of sweets, carry them off in a paper packet and sit basking in the sun on the beach savouring them. Like the candy floss, most of those sweets were pastel in colour.

After considering names for my pincushion and chatting to my daughter about these memories, Pastel Candies seemed apt. She'd reminded me that in Australia 'sweets' are called 'lollies' or 'candies'.

I was delighted by this lovely, carefully chosen gift from my daughter overseas. It's a lustrous pink, Thai silk. And it matches the wools beautifully. 


It was the perfect for the back of the Pastel Candies pincushion. 


These are not quite like some of the ones I remember, but we did find some pastel candies.


Here it is altogether: the final pincushion with the pastel candies, wool and silk. 


Now to enjoy those sugared almonds, and think of beach holidays in the sun.

'Till next time, happy stitching!

------------------------

* Photo source: 'Who remembers old Durban', Facebook


Wednesday, May 24, 2023

Flower of the year

This deep purple Agapanthus Blackjack is the flower of the year at Chelsea Flower Show. It was developed by de Wet plant breeders in South Africa. Congratulations!

I can see why the name Blackjack was chosen. It's the most extraordinary colour.

Andy de Wet with Agapanthus Blackjack (Courtesy: Boom in Business)

It's lovely to have this snippet of good news from South Africa among the stories of the difficulties the country is facing with the ongoing extensive power cuts.

Thursday, May 4, 2023

Tips for binding an embroidery frame

I've been binding another round embroidery frame, or hoop, with cotton twill tape. Binding improves the grip of the frame on the embroidery fabric and keeps it taut in the frame. Here are some tips to make the process easier.

I used laundry pegs to hold the tape in place. Both my plastic pegs and the stainless steel ones worked well.

While wrapping the tape around the wooden hoop, control the roll of tape by unwinding a short length and then insert a pin into the roll. This way you keep it from taking on a life of its own and rolling away onto the floor - way out of reach!

I usually overlap the tape as I bind around the hoop because I have found that the tape doesn't easily shift on the frame. Overlapping it does however use a fair bit of tape. 

So, this time to save on my dwindling supply of tape, I'm placing each wrap next to the previous one, without any overlap. I've stitched a few stitches on the inside of each wrap to keep the tape in place. You may just be able to see the stitches if you click on the photo below and enlarge it. 

If you are planning on binding a frame, I hope these tips will be helpful. For an in-depth tutorial on binding a hoop, have a look at Mary Corbet's blog here on Needle 'n Thread. Mary also has a subsequent update on the tutorial which you can see by clicking here. There's plenty of useful detail in the tutorials especially if binding a hoop is something new to you.

I've just returned from a wonderful trip to visit my daughter and family in Dubai. I took a small stitching project with me and picked it up only once! Now to recover from the jetlag and get back to some embroidery. 

'Till next time, happy stitching - perhaps with your newly bound frame!


Wednesday, April 5, 2023

Can You Help Find This Missing Sampler?


This 1820 sampler is missing from a museum. Read the post on the Thistle Threads blog here to find out more about it and perhaps help with the search.

Thursday, March 23, 2023

Barberton Daisy Needlecase

Here's the sprig of flowers I embroidered as part of the guild's stitch along, and which I wrote about in this blog post here

I finished it into a needle book with two felt pages.

I used a DMC pearl thread # 8 to outline the spray of flowers with Holbein stitch. It happened to be the exact same colour as the pink thread of the petals. Both threads were passed on to me years apart and by different people. What a coincidence!

The lazy daisy bullion stitches of the petals look as though they could be the petals of Barberton daisies. Barberton daisies, also known as Gerbera jamesonii, and indigenous to Barberton in South Africa, were the first gerbera to be scientifically described (Wikipedia). 

Gerberas and chrysanthemums

I have fond memories of my uncle proudly growing 'Barbertons' along his new front garden wall - the wall my cousins and I secretly walked along while my uncle was at work. We only got found out when the youngest cousin who could barely yet walk, climbed up, tried to walk along the wall and fell off! That was the end of playing on the wall.

'Till next time, happy stitching!


Monday, March 20, 2023

Marble Lace

This is not exactly embroidery, but it does have extraordinary embroidery detail. The lace cravat and sleeve ruffle that are hewn out of solid marble are captivating. Then there's the wonderful detail on the fringe and the embroidered buttons.

Courtesy Wikipedia Commons

The sculptor was Louis Phillipe Mouchy. 

Sunday, March 12, 2023

Using Old Embroidery Thread

There's an informal stitch along (SAL) at the Embroiderers' Guild of Queensland on the first Saturday of the month. It takes place during the regular meeting and each month there's a different sprig of flowers to stitch, with expert guidance on the stitches. The SAL is led by Deborah Love and there's also a lovely friendly exchange of ideas and information among the members. 

I took along a box of well-used and much-treasured threads that had been passed on to me, knowing that I would need just a little bit of each colour for the first flower spray. I plan to make small articles  rather than a cushion or a large picture.

The SAL started off with lazy daisy bullion stitch. (Also called 'Bullion Knot - Detached Chain' or 'Bullion - Lazy Daisy'.) After a few less than successful attempts at bullion stitch in the past, I have studiously avoided it - despite the excellent tutelage of Lynne Laver of the Cape Embroiderers' Guild whom we fondly refer to as the Bullion Queen. But, it was time to tackle this tricky stitch again - with an added lazy daisy stitch.

Well, I struggled. The needle just wouldn't pull through the loops. I tried a smaller milliner's needle. I tried wrapping the thread a little looser around the needle. I tried giving the needle a slight twist when caught on the wraps. Nothing made a much of a difference. Eventually I began to blame the thread. After all, a bad workman always blames his tools, or in this case, the thread. It seemed unusable.

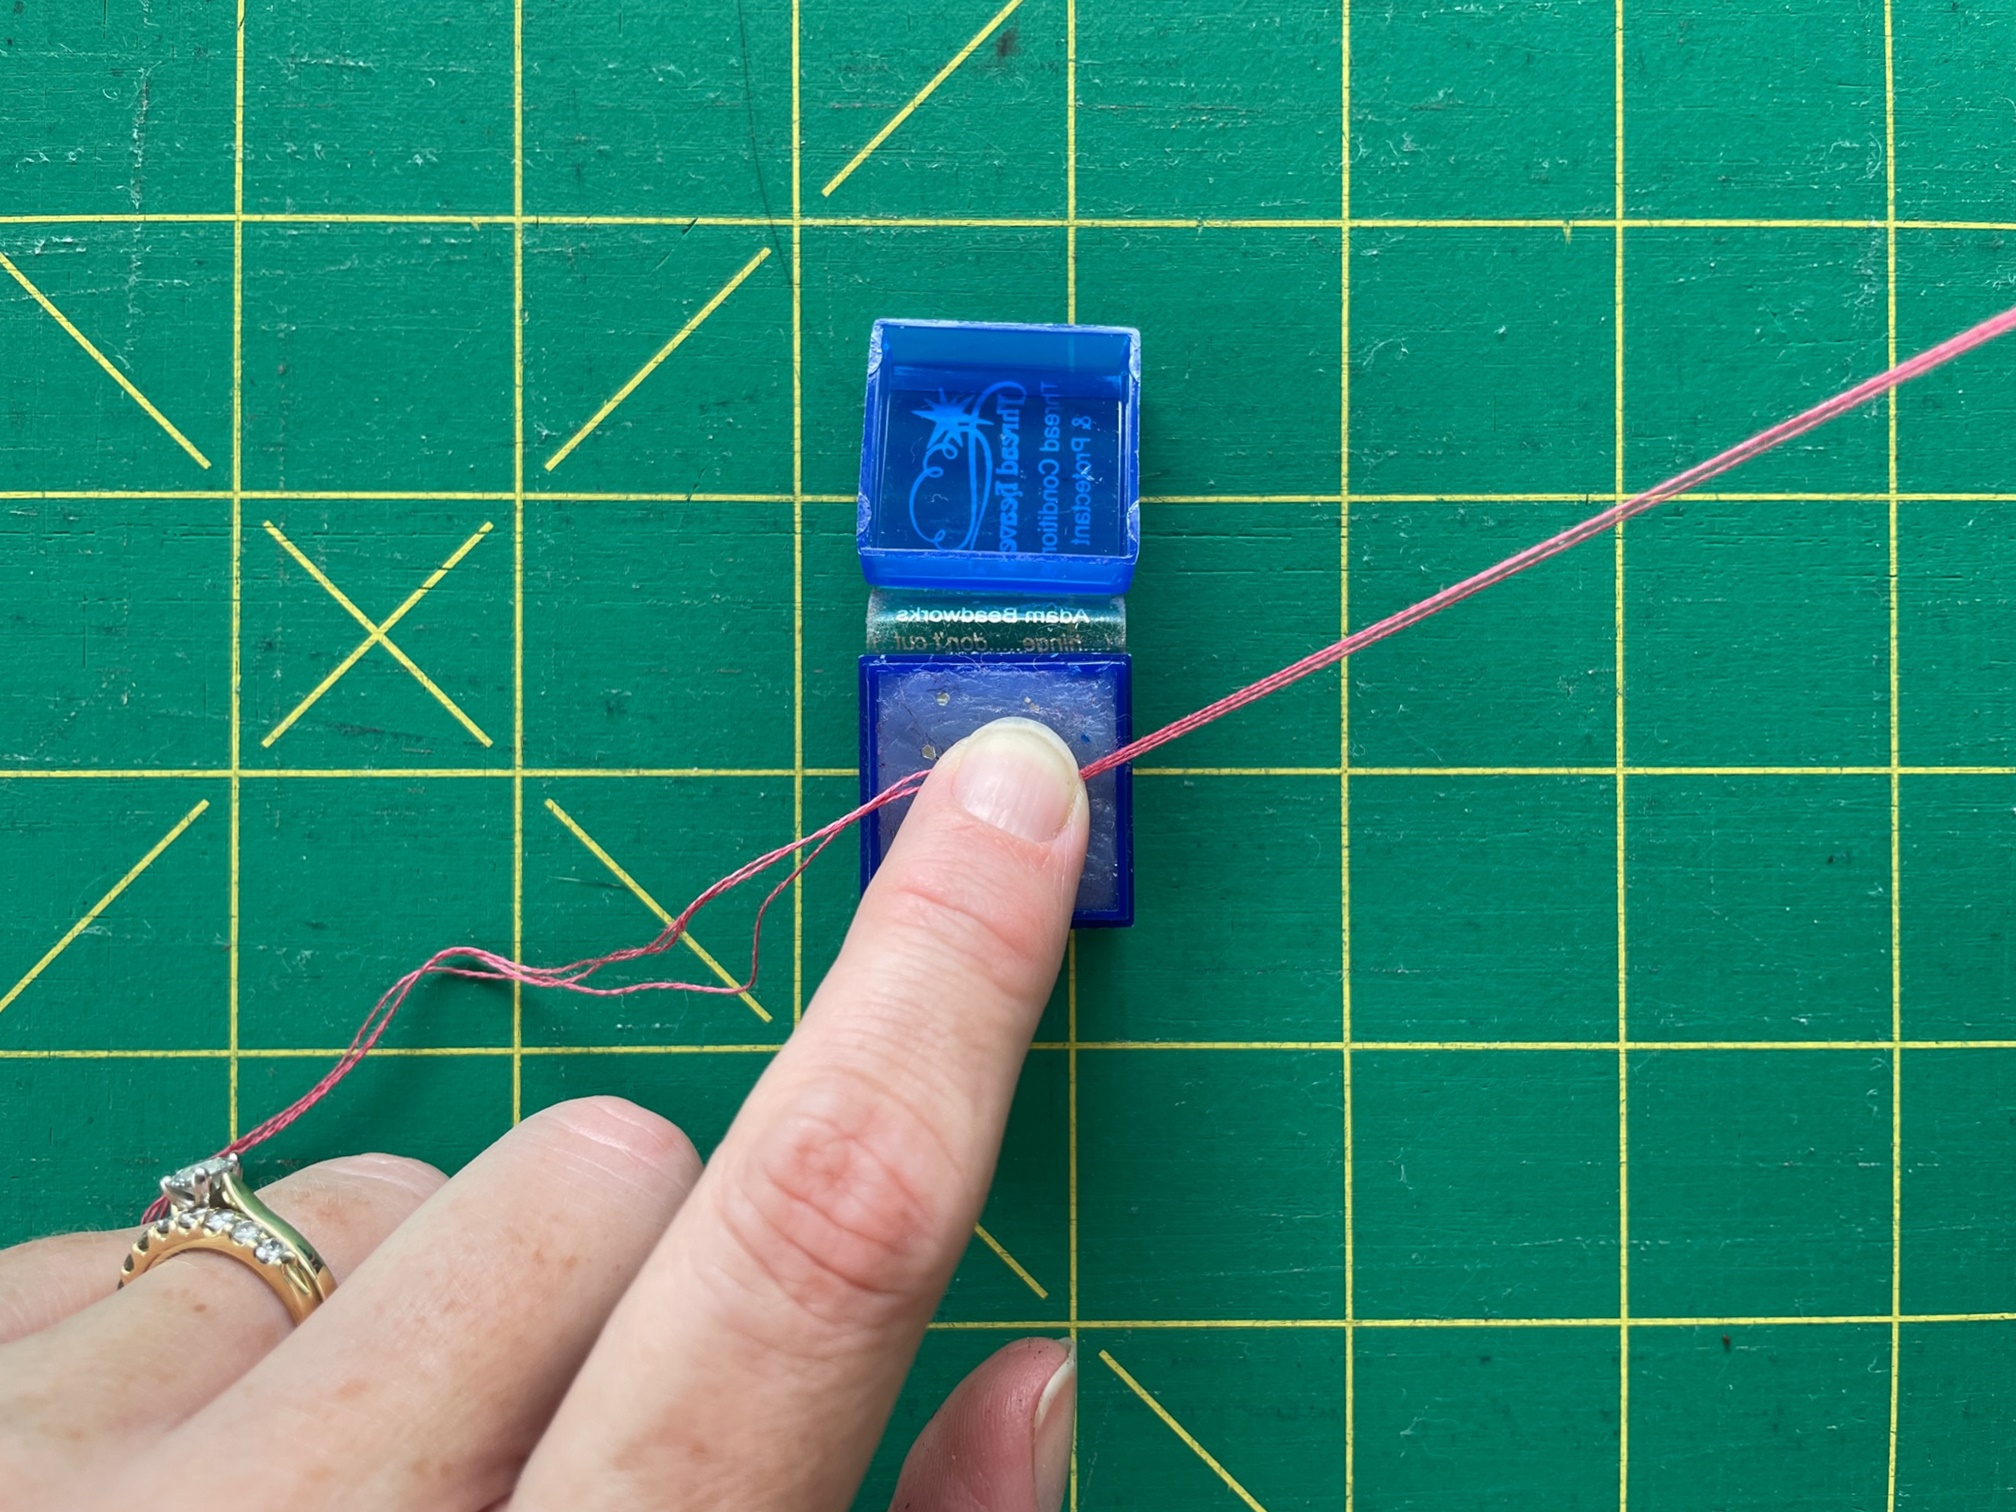
But, thread conditioner came to the rescue! I separated out my three strands, pulled each one over the surface of the thread conditioner, then I put them together and pulled for one more coating.  

Not only did the needle slide through the wraps more smoothly, but it was much easier to thread the needle too! The thread conditioner also ironed out some of the wrinkles in the thread making it less springy and easier to work with.

I would guess that the thread is very old. Natural fibres decompose over time especially in less than perfect conditions. Light, heat and moisture all play a part in the process. Perhaps some of the chemical bonds in this cotton have begun to deteriorate causing it to lose some of its smooth finish?

Although the Thread Heaven conditioner solved my problem, I would be wary of using this particular thread on a big important project. I still have a way to go for achieving really neat bullions, but I have made some progress. At least I have gotten over the mental block I had about doing them.

'Till next time, happy stitching!


Friday, February 24, 2023

Daisy Band Sampler Pincushion

I've drawn up a pattern for the little pulled thread sampler I've been working on in the background and the pattern is now available in the Etsy shop. You can see more about it by clicking here.

The idea for the embroidery originally grew from trying out a piece of pulled thread embroidery without the benefit of an embroidery frame. You can read more about that in this blog post here. Although it was a novel experience and quite successful, I am more familiar with embroidering in a frame and since completing the sampler, I have reverted to using one. 

Originally, I wanted to see how different or difficult it was to work various stitches while holding the embroidery in my hand and I chose several popular pulled thread stitches for my test sampler. I also love doing a variety of different embroidery stitches. Any excuse to add another stitch! I can see why through the years samplers of all types have had an endless appeal to embroiderers. 

It's simply fun to use lots of different stitches and watch how each one turns out as you stitch it - without the distraction of a design. The stitches speak for themselves.

Once the stitching was done and it seemed like a nice little project to do, I started drawing up a pattern. But, there were quite a few delays. Besides Christmas and having family to stay, one was that the software I use suddenly had a glitch. That took quite a while to iron out. Another was that photos of the finished pincushion proved a challenge. The first few with my trusty point-and-shoot camera were disappointing, so Rod took some with his phone. 

They were much better than my first two attempts but the rich inky background turned out to be rather overwhelming. In the end, we had a bright day and I found a bright spot on the patio to take the photos. I settled on the white background I started out with and used those photos for the pattern.

The pattern has instructions and stitch diagrams for a collection of pulled thread stitches, worked in bands across the linen. There's also a pretty row of daisies in-between and the embroidery is finished off as a pincushion. It's a digital pattern and easy to download from the link that Etsy sends with your receipt.


Visit my shop Lynlubell on Etsy to browse all the patterns, or go directly to have a look at the Daisy Band Sampler pincushion pattern by clicking here.

Till next time, happy stitching!

Monday, January 30, 2023

Pastel Candies - Pretty on Point

With a selection of pretty pastels and no set plan in mind, I've been trying out a few ideas for a canvas work pincushion. Starting with pink and lavender blue, I soon settled on the centre. I remember seeing something similar in a small Good Housekeeping booklet some years ago. I like the unusual swirling effect when you turn it and look at it from an angle.

I tried out colours and stitches for the next rounds, and after stitching and unpicking some of them, I remembered to take this photograph. 


It's been a busy and happy few months with family around and I picked it up and put down with little progress. That is until last week. The pincushion is now almost finished and I'll post more once I've sorted through my photos.

I hope you have made a good stitching start to the year.
Till next time, happy stitching!