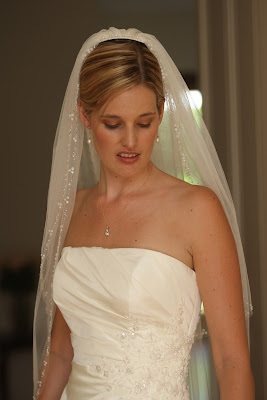
Years ago I trimmed my daughter's wedding veil with beads. She had collected some beads on her travels and planned to use them to add a glimmer of light along the edge of her veil.
The veil has been in storage and needs ironing but I would nevertheless like to keep a record of it so I photographed it as is.
There was lots of fun and to and fro by email to find the perfect look! The spacing as well as the size of the beads and sequins made a big difference to the delicate effect we were after. These are a few of the drawings and samples I stitched, together with the eventual pattern.
To transfer the design for the veil - which is circular - I drew up the pattern for one quarter of the veil. I covered the pattern with plastic and then tacked it under the tulle. The plastic overlay ensured that no black ink markings were transferred from the pattern. It also provided stability to the fine net while I worked on it adding the beads.
One half of the circle was embroidered on the front of the tulle and one half on the back. This was so that the circle of tulle could eventually be folded in half and all the beading would be on the right side. Finally, I beaded a white hair comb, gathered up the net, and attached it to the comb.
It dawned a glorious summer's day for the wedding too. In typical Cape Town fashion, it was windy! But not even the howling Cape southeaster could spoil it.
The bride was radiant and beautiful!
What a wonderful, happy day!


Wow Lyn, that’s fantastic- so clever and challenging as well as effective and a stunning result. Are you planning to restore/replace the beads for posterity? Beautiful final photo.
ReplyDeleteThank you. I will leave the veil as it is unless someone wants to use it again.
DeleteWow Lyn, that’s fantastic. As well as a stunning result, it’s great project management and problem solving! The final photo is truly beautiful. Are you planning on restoring/replacing the beads for posterity?
ReplyDeleteThanks, Jillian. I so enjoyed working on it! I don't think it's worth doing anything to the beads now.
DeleteThe bride and her veil are absolutely gorgeous!
ReplyDeleteThank you.
DeleteA beautiful veil and bride. It reminds me of the other veil you embroidered which was also very special
ReplyDeleteHi Tricia, Thank you for your kind comments!
DeleteA beautiful veil and bride.
ReplyDeleteA labour of love, this is one of the best gifts from a mother to her daughter. I am glad you made this post to record the process. We really need to leave notes for future generations so that they can know the history of the things we create.
ReplyDeleteThe bride is so beautiful in her elegant veil.
Queenie
Thank you. It was both challenging and very rewarding.
DeleteA lovely result, indeed!
ReplyDeleteThank you.
Delete